Note: This post contains affiliate links. Read my policy here.
Do you have a love-hate relationship with your calendar?
Maybe it’s a clunky thing tacked to your wall or a series of notebook pages. Maybe it’s an ugly electronic system from the stone age that your employer set up.
Your calendar is supposed to make your life easier by keeping you organized and in the right place at the right time.
If yours isn’t up to the task, it’s time to upgrade to Google Calendar. Need convincing? Here are 10 awesome ways that Google Calendar gets rid of the hassle and radically streamlines your life:
1. Create multiple calendars.
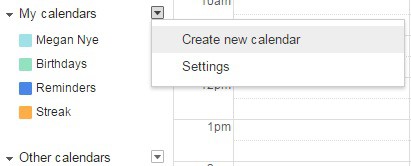
You’re a complex person, so don’t try to force the many aspects of your life into a single calendar. Google Calendar lets you create a slew of calendars under your user name.
- In the left sidebar of the Google Calendar window, locate the section labeled “My calendars.”
- Click the triangle next to your desired calendar.
- Select “Create new calendar,” and you’re on your way.
Here are a few ideas for the types of calendars you can make:
- Birthdays and anniversaries,
- Work meetings,
- Class schedule,
- Bill payment due dates,
- School or day care holidays,
- Kids’ extra-curricular activities,
- Community events schedule,
- Checkpoints for the planning of your summer vacation,
- Household chores,
- and sooo many more.
If you want to create an extra level of organization — or just spiff up your calendar — Google allows you to color code your individual calendars.
2. Streamline your view.
Multiple calendars are awesome! But now, after creating a dozen of them, you have a new problem.
You have information overload.
For your needs at any given moment, choose exactly which combination of calendar events you want to see. Maybe just your work meetings. Maybe all of your kids’ activities calendar alongside your night class schedule. You choose!
- In the left sidebar of the Google Calendar window, locate the section labeled “My calendars.”
- Click the colored square next to a calendar to turn it off.
- Click the now-white square next to that calendar to turn it back on.
3. Tap into the power of notifications.
With notifications, your Google Calendar moves beyond a storage place for your events and turns into an invaluable reminder system.
There are two ways you can set your notifications.
First, you can easily set default notifications settings for every event you create in a particular calendar.
- In the left sidebar of the Google Calendar window, locate the section labeled “My calendars.”
- Click the triangle next to your desired calendar.
- Select “Edit notifications.”
- In the “Event notifications” section, add a custom notification that will be applied by default to every event in your calendar. (Choose from E-mail notifications and pop-up reminders.)
- Add more notifications if you think you need them!
- Click the “Save” button.
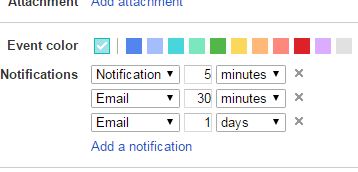
Second, you can create new notifications or modify default notifications on an event-by-event basis.
- Double-click an event in your calendar.
- On the “Event Details” tab, scroll down to the “Notifications” section.
- Click “Add a Notification” to create new E-mail and pop-up reminders.
- Modify or delete existing notifications as desired.
- Click the “Save” button.
4. Count down to your next appointment.
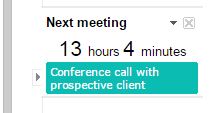
Want to add some extra features to your Google Calendar? Take a look at the Labs available. In particular, see how much of a break you have until your next appointment by turning on the “Next Meeting” function.
- Click the gear icon on the top right corner of your calendar.
- Select “Labs.”
- Scroll down to “Next Meeting” and select “Enable.”
- Click the “Save” button.
5. Put reminders for special dates on autopilot.
There are so many dates to remember! So you write them on your calendar . . . every . . . single . . . year. What a pain!
Then you forget to look at your calendar. Or you look at your calendar and note that today is your friend’s birthday . . . but it’s too late to send a card today!
Let’s solve this problem once and for all!
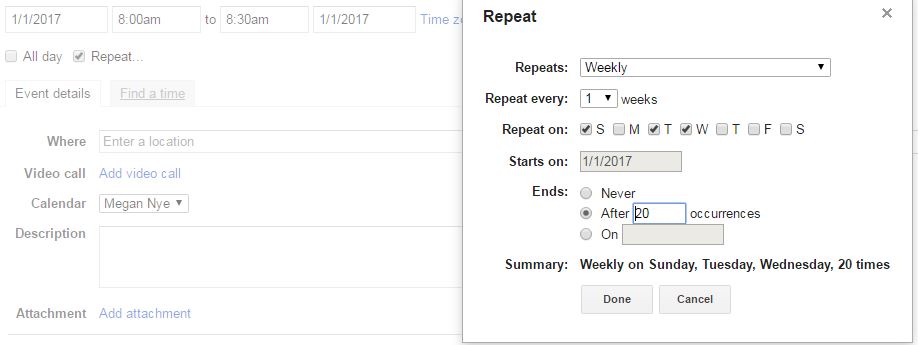
Tap into Google Calendar to set up recurring events and reminders for all of your important dates — birthdays, anniversaries, bill due dates, anything really.
Set it up so that your event repeats just a few times or forever. And you can create all of the nagging, automated reminders that you want.
- Click the desired time and date slot on your calendar and click “Edit Event.” (Note: If all you want is a reminder without an actual appointment blocked off, choose “Reminder” instead of “Event” after clicking the time slot.)
- Enter your relevant details: “Dad’s birthday,” “Tuition due,” whatever.
- Click the “Repeat” checkbox at the top of the event page and set your preferences.
- Click the “Save” button.
6. Import ready-to-go calendars.
If you’re interested in keeping track of events beyond those on your personal agenda, someone may have already created that calendar for you!
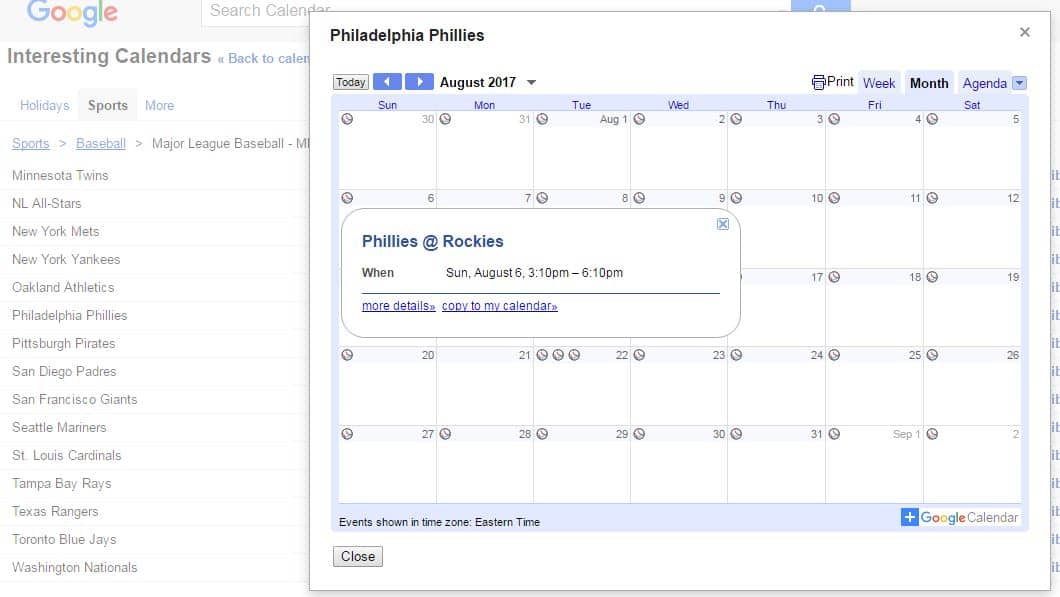
Enter “Interesting Calendars” — a selection of calendars that you can import into your own. Keep track of national holidays, game schedules for your favorite sports teams, phases of the moon, week numbers, and even stardates (for my fellow Trekkies).
- In the left sidebar of the Google Calendar window, locate the section labeled “Other calendars.”
- Click the triangle next to “Other calendars.”
- Select “Browse interesting calendars.”
- Drill down as needed to the calendar of your choice.
- Click “Preview” to view the calendar without subscribing and “Subscribe” to import the calendar.
Don’t see the calendar you want? You can import any calendar in iCal format if you know the URL.
For instance, Episode Calendar allows you to customize a calendar with the dates new episodes of your favorite T.V. shows air. It’ll then give you a link to import those details directly into Google Calendar. Never miss your show again!
7. Coordinate with ease.
If you’re trying to share information and coordinate your schedule with someone else, collaboration is key.
Whether it’s orchestrating events with your busy family or setting up meeting times with coworkers, you can allow just the right amount of access to your chosen audience.
Plus, those multiple calendars you created come in handy here — particularly if you want your manager to see your meeting availability but not the details of your personal life.
- In the left sidebar of the Google Calendar window, locate the section labeled “My calendars.”
- Click the triangle next to your desired calendar.
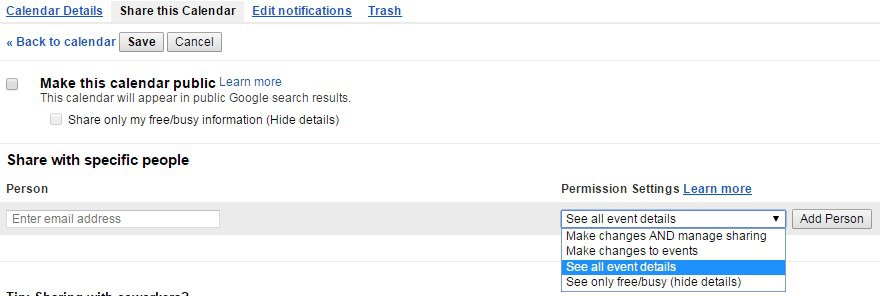
- Select “Share this Calendar.”
- Enter the E-mail address of each person with whom you wish to share your calendar.
- Choose the type of permissions you want to assign each person. (See image below.)
- Click the “Save” button.
8. Let Google Calendar be your personal assistant.
I don’t know about you, but I don’t have a handy assistant who shows up without fail every morning and hand-delivers a copy of my day’s agenda.
Well, I didn’t. Now I do.
With a quick setting update, you can have Google E-mail you a list of your day’s tasks before you even get out of bed.
- In the left sidebar of the Google Calendar window, locate the section labeled “My calendars.”
- Click the triangle next to your desired calendar.
- Select “Edit notifications.”
- Click the checkbox next to “Daily agenda.”
- Click the “Save” button.
9. Use Google’s powerful search features right in your calendar.
Not sure if you need another oil change because you have no idea when the last one was? When was your most recent dentist visit? How many times have you had lunch with a client this year?
Google Calendar easily answers all of these questions by integrating the power of Google search.
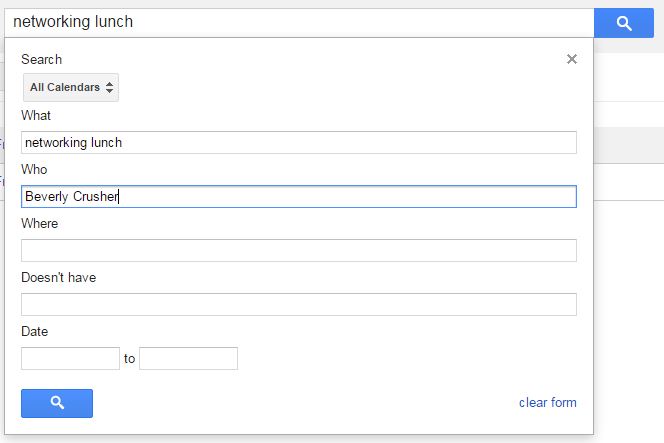
Head to the very top of your calendar, where you’ll find a handy search bar. You can quickly pull up every occurrence of an event.
If a basic phrase search isn’t enough to get the job done, click the arrow on the far right of the search bar. You’ll instantly get access to advanced search features to hone in on exactly what you need.
10. Create appointments with a flick of the wrist.
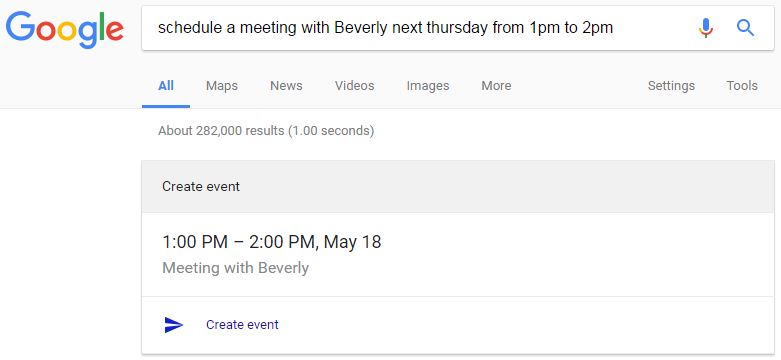
Here’s a neat trick: Quickly create an appointment without ever opening Google Calendar.
Got Google search up and running? Just type the details of your event directly into the search bar! Here’s what happens:
Done! Just like that!
If you are in Google Calendar but don’t want to fiddle with the event details window, take a shortcut.
- In the left sidebar of the Google Calendar window, click the arrow next to the red “Create” button.
- In the “Quick Add” window that appears, write a phrase that summarizes your event.
- Select “Add.”
You’ll see confirmation of your meeting info:
So there you have it — 10 new ways to make your life easier, more fool-proof, and more efficient with the power of Google Calendar!
How do you use Google Calendar to streamline your life?




Leave a Reply